| |
|
|
|
back to F/A-18 main |
 |
About designing the F/A-18 Hornet
|
 |
|
 |
|
|
|
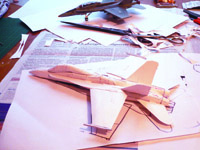
| The first prototype in Sept. 2008 |
|
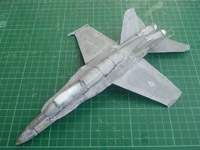
The failed Beta was a papermodelers nightmare |
| |
|
|
|
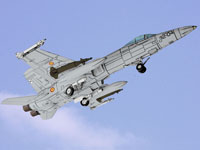
The development of my F/A-18 model was very unique in the history of Stahlhart papercraft. Now, as it comes out, it’s the paper model with most versions I ever did, and might even be the one with the most versions, that has ever been done. It’s also the one with the most detailed patterns for the wheel wells, which was simply owed to the fact, that I had a very good reference. Until now, the F/A-18 is also my model with the longest development history, a history of pain, trouble and yet, endurance. I built the first prototype in September 2008 after the Marauder, using two old plastic models as a reference, but I was too sloppy, eager to finish quick. I received the reward for that, when I built the first beta, which I now call the failed beta. This beta was a nightmare of a papercraft, parts didn’t fit, the lower fuselage was a bumpy something, and I had made absolutely no plans, how to integrate the wheel wells. It was a dead end, and the only reason, that made me go on was to prove myself, that I can build a good model of the F/A-18.
|
 |
|
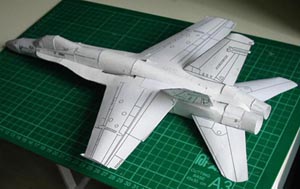
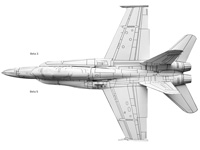
The second prototype was scaled up to allow better accuracy. It retained parts from the failed beta.
|
|
The only parts of the failed beta, that could still be used were the wings, Stabilizers and tails. For the second prototype, I decided to scale up by 150% to be better able to work on the engine area, which was extremely bad in the failed beta. I started the new prototype with the box of the main fuselage which was meant to contain the wheel well, and created formers to become the wheel well walls. From there I build a new rear fuselage, that used three angles, with a divider in between, which creates the transition from the squared fuselage to the round engine outlets. I based the forward fuselage on the one from the failed beta, but it ended up completely different. To achieve a better shape for them, I also added an angled stabilizer instead of a squared one for the wings, the first to appear in a stahlhart model.
|
 |
|
 |
|
|
|
| The Beta 1, as it appeared as a preview picture, coloured in photoshop |
|
The Beta 2, as it appeared as a preview picture, coloured in photoshop |
| |
|
|
|
The second prototype lay around quite long. I decided to finish the Draken first, which had been a by-product of my frustration with the failed beta. When it was the F/A-18’s turn to become a new beta, things went quite easy. I recycled the Landing gear that I had drawn for the failed beta. The first beta worked better than I expected. The only major problem was the forward fuselage, which looked like it had a kind of humpback. This was fixed in the second beta, which also got hardpoints, tanks, pods and LGB’s. The biggest problem at this stage were the LEX’s, which didn’t fit. They were improved in the third beta, and finally fitted in the fourth beta. The fourth beta was basically the first with finished structure. But I was very displeased with the panel lines.
|
 |
|
 |
|
|
|
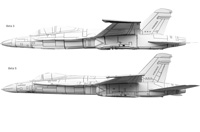
| The new panel lines of the Beta 5 from above, compared to the Beta 3 |
|
The new panel lines of the Beta 5 from the side, compared to the Beta 3 |
| |
|
|
|
The first panel lines had been based on the original 3-view I used. When I found a better one, I decided to redo most of the panel line work. I drew the more detailed lines on the beta 4 and disassembled it, to scan it and include the lines for the beta 5. The beta 5 turned out as I had hoped and concluded work on the basic model.
After it, I turned to the colour prototypes and then betas, which I built in pairs from then on, because the line work for all planned special markings and camo versions didn’t fit on one model. I had to do them over too many times. Each time I hoped that on the next beta, everything will fit, but it didn’t and another beta was done. This was the phase that took longest, and in February, this phase was finally concluded.
|
 |
|
| Two typical colour betas. These two were build as a pair. |
| |
|
The drawing of the landing gear and wheel well detail as well as the details of the special markings versions were a big accomplishment in themselves. I worked two weeks for one hour every day on the landing gear detail and another two on the more important special markings. This was helped by a detailed walkaround, which showed all these parts in great detail. It was an ugly and boring work, but at the end it was worth the effort. Still, I don’t know, if I will or can ever redo it as good with other models, because an equally good source can’t be always found.
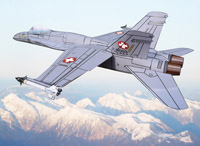
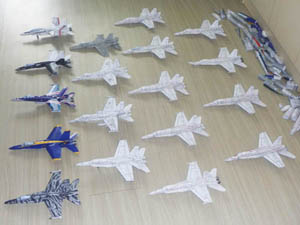
The final phase was the creation of the versions. I had thought there will be over 30 versions, but counting all blue angels, alternative two seaters and white versions, the number of versions at the time of release was 41. I was marvelled myself by just how amazing the job was I had done, and hoped, that all these wonderful versions will be build by someone each sometime. I built the model 21 times. Now it’s up to others to build it.
|
 |
|
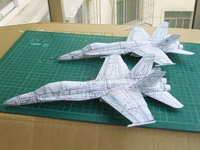
| These are all the surviving Hornets I have build. Missing are three scrapped betas and the two prototypes. In the back are additional incomplete testbuilds. |
| |
|
The F/A-18 model was cursed right until the release by problems and delays: Once the model was finally ready for release, it was still delayed for more than one week, because of a corrupted image file in the instructions and a sickness of its creator.
Werner Smuts was a big help during the development of the F/A-18, helping me to do additional test builds and finding mistakes. |
| |
 |
|
 |
|
|
|
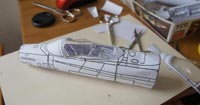
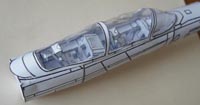
| Cockpit test built in 1:30 scale, with the canopy built from cheap foil. But it was necessary to test the canopy, how does the seat fit in. |
|
Test built of the Two-seater Cockpit |
| |
|
|
|
Created alongside with that of the Draken, the Hornet’s cockpit kit was one of the last two that had to be created, when all other models already had cockpit kits. That was in May 2013, although it did take a long time, before the details could be created. As the Hornet is one of the more popular Stahlhart-models, I tried to keep the cockpit easy to build (as far as such small parts can be easy to build). Yet for the artwork, I had to work really well to have it on-par with the rich detail of the model. With the same reference material, this was an easy yet tiresome job. But it payed off for the result.
|
| |
| return to top |
|
|
|