| |
So |
|
|
back to Cow/Ox main |
 |
About designing the Cow/Ox
|
 |
|
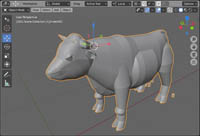
The ox and cow together. Note how the cow has what would later become the two diffferent mouths of ox and cow.
|
|
It was around autumn of 2020 when I found out, that the free 3D-Software Blender has an extension to export as a paper model. After trying this out somehat I figured I need to learn to create my models there, because it gives great advantages over Sketchup. Firstly, it can automatically export to paper model (or something remotely similar) and secondly, because it allows one to paint on the model in 3D and then export the pattern. So I figured, the Ox/Cow is going to be the project I will learn papermodelling in Blender with.
|
|
|
|
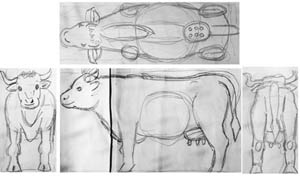
As with all 3D-models, I first created a "blueprint" to work from, with the view from the side, front back and top/bottom. As I did not have access to a scanner, I photographed it, made the views to the correct size and put them into Blender. The basic functions were quickly to learn. A lot works similar as in Sketchup. But it has another huge advantag: Rather than surfaces and edges, single points called vertices (singular vertex) can be edited as well. It took me a while and a bit of cursing (I am ashamed to admit) to get used to the functions. Especially the scaling gave me trouble until I figured it out.
|
 |
|
 |
|
|
|
| Construction in Blender. |
|
The first test with the completed body. |
| |
|
|
|
| |
| So after some time I had managed to get all parts of the cow together. I had first considered having stronger legs or a smaller belly or a higher shoulder for the ox as compared to the cow, but then I noticed on pictures, that oxen are not necessarily better built than cows. And it was good I didn't, because all patterns and all would have to be done many times. The longer horns were originally also considered to be for the ox and the short horns for the cow, but there are also longhorn cows, so I just made them optional. The two pairs of ears come from, that after I had done Ear A, I noticed on a picture of a cow, that the ears are actually somewhat tubelike at the roots and created Ear B. As I couldn't decide which ear to keep I made them optional. (now you know the secret why my models often have so many options) |
| |
 |
|
 |
|
|
|
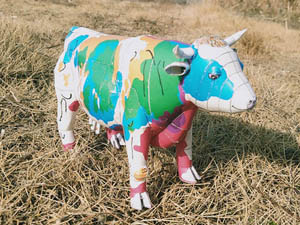
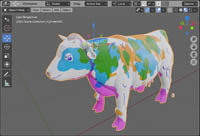
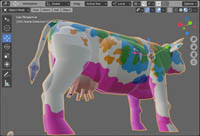
| Patterns are painted on. |
|
another view of the same. |
| |
|
|
|
The next step was painting the patterns. This was all new to me and it took a while until I got also used to this. It's a huge advantage over having to print out, draw on with a pen, cut apart and then draw again. Although it isn't perfect, because the drawing is pixel-based and not as accurate as vector lines. I painted all three major versions in the same pattern, to save time. The cow was ready and looked great in Blender, now only to export to Paper model...
|
And what came out was a mess! I had expected that parts will be randomly placed, but the colours came out wrong and all. That was very frustrating and I was close to giving up. But then I said, if I give up that easy I will never learn the software. So I tested and played around and finally got it done.
As it often is, the solution was actually very simple in the end. |
|
|
 |
|
 |
|
|
|
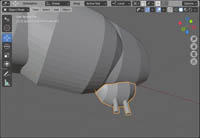
| The optional long horn and ear A |
|
The udder re-created with four teats. |
| |
|
|
|
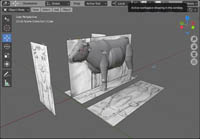
But nevertheless, things had to be tidied in my vector-software, Freehand. The parts had to be placed in a tidy manner, unneeded lines deleted and the pixel-based pattern to be turned into vectors. To make sure, that patterns align correctly across seams, I spend three days to only check those. Then I made the mistake of using a so-called "lens"-function to have the layered three colours, the "multiply"-function which is standard today is not available as that software is older. That was a huge mistake, as the pdf's could not be exported. Again I had to re-work everything. This cost me two days. Then everything was ready and the pages for the testbuild could be printed.
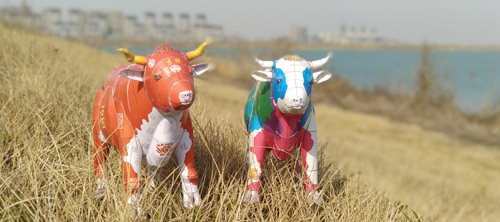
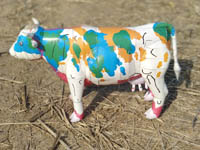
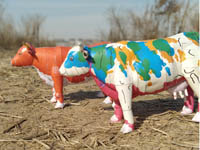
The Chinese new year ox was built first do make sure that version will be finished for the new lunar year. It still had a number of bigger errors: The feet were red instead of white (photoshopped out for the gallery) and the eyes were backward (if you look closely you can see in the pictures that the eyelashes face the opposite direction.) |
| |
|
While writing the text for the instructions I found that cows actually only have 4 teats, while I had somehow assumed they have 6 (don't know why, don't ask, would you have known?). This meant I still had to re-create the udder with 4 teats. While finishing the Chinese new year and white versions, which I published on the last day of the lunar year 2020, I built the cow with the patterns and fortunately most patterns aligned great across the seams, only few had to be adjusted. From there, creating the remaining versions was easy. But it took another week to get it all done, because again and again I kept finding small errors, which had to be corrected in all 22 versions.
Concerning the big and small versions: I actually spend a long time thinking about what scale I wanted to do and then opted for 1:10 because it is a popular scale for action figures. But then I thought how massive the Rat and Dog versions were and I thought I should also do a version which is the biggest that can fit on A4. It proved a good choice, as the eyes and in particular the long horns turned out to be rather fiddly to build at 1:10.
While I am looking forward to creating the Tiger for 2022, I have decided that I will not try to get it done at all cost before the lunar year starts, because that caused me a lot of stress this time and I ended up doing the work not liking it!!! Also by the time I will have a new job and don't know how much time I am going to have at all. |
| |
 |
|
 |
|
|
|
| Testbuild from the left... |
|
... and from the right. |
| |
|
|
 |
|
 |
|
|
|
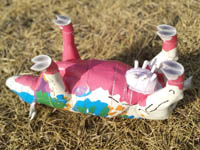
| The testbuild from below. Note that this Super-cow has 6 teats. |
|
The patterned testbuild along with its elder sibling. |
| |
|
|
|
| |
| return to top |
| |
|
|
|